
Installations
- Download and Install the Anaconda distribution from Anaconda Website.
- Windows users, download and install the Git Bash from Git Website.
Configure Project Repositories
Create an empty GitHub repository with the name of you Project/Website. Make sure Initialize this repository with a README is unticked.
In your computer, create a folder with the same name as your GitHub repository.
Mac users, open terminal and cd into the folder you created in Step 2.
Windows users, open the folder you created in Step 2, Right Click -> Git Bash Here.Type these commands:
echo "# Jupyter GitHub Website" >> README.md
git init
git add README.md
git commit -m "first commit"
git remote add origin *Repo_URL*
git push -u origin master
Replace Repo_URL with your GitHub repository URL.
Go to the GitHub repository you created in Step 1. Your repository should have the README.md file that you pushed in the previous step.
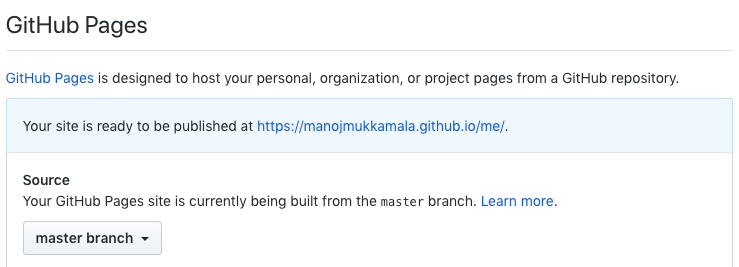
In your GitHub repository, go to settings. Scroll down to the GitHub Pages section. In the dropdown next to Source, select master branch. Then you will get a URL to your project website. Save it.
Packages

After installing Anaconda distribution
- Windows users, open Anaconda Prompt from Start Menu.
- Mac users, open a terminal window.
1. Jupyter Notebook Extensions
Install Jupyter Notebook Extensions by typing the following commands at command prompt:
pip install jupyter_contrib_nbextensions
jupyter contrib nbextension install --user
If you get error: jupyter: 'contrib' is not a Jupyter command, try the following commands instead:
Mac: python /Users/user_name/anaconda3/lib/python3.7/site-packages/jupyter_contrib_core/application.py nbextension install –user
Windows: python C:/Users/user_name/AppData/Roaming/Python/Python37/site-packages/jupyter_contrib_core/application.py nbextension install –user
Based on your operating system and the version of Anaconda distribution at the time of your installation, your path may be different.
If you still have trouble finding the path, type pip uninstall jupyter_contrib_nbextensions but don’t uninstall it, then you will get the path where jupyter_contrib_nbextensions is installed.
More info can be found at this link.
2. Hide Code
Hide Code is a Jupyter Notebook extension that enables hide code cells, export to HTML, export to PDF and other customizations to Jupyter Notebook.
More information on hide_code can be found at this link.
Install hide_code with the following command:
pip install hide_code
jupyter nbextension install --py hide_code
jupyter nbextension enable --py hide_code
3. Jupyter Themes
Jupyter themes helps customize the Jupyter Notebook interface. More information about Jupyter Themes can be found at this link.
Install Jupyter themes using the following command:
pip install jupyterthemesI am using the following customization for my notebooks:
Jt -N -T -f firacode -tf opensans -nf latosans -fs 99 -tfs 11 -nfs 111 -dfs 105 -ofs 105 -cellw 66% -t grade3More detailed customization details can be found at this link.
Customising the Cascading Style Sheets
Open .jupyter folder. It is usually a hidden folder so sure that you enable Show hidden files option in your computer
Windows users can find the folder at
C:\users\user_name\.jupyterMac users can find the folder at
/Users/user_name/.jupyter
Go to the custom folder and open custom.css with a text editor of your choice and paste the following lines anywhere:
img {
display: block;
margin-left: auto;
margin-right:auto;
}
div.output_area .rendered_html table {
margin-left: auto;
margin-right:auto;
}
Save and close the custom.css file. (The above code aligns the plots, images and tables to the center of the notebook/HTML page)Now copy all the files in the custom folder and paste them to the Project/Website folder that you created earlier.
Note: Every time you tweak your Jupyter Theme, you should redo this section.
Tweaking Jupyter Notebook Extensions
Open Jupyter Notebook.
- Windows users, type Jupyter Notebook at Start Menu.
- Mac users, type jupyter notebook in the terminal.
This opens jupyter notebook in a browser. Navigate to the Project/Website folder that you created earlier and select a New Python 3 Notebook from the dropdown at top right corner.
Go to Edit -> nbextensions config.
If ticked, Untick the disable configuration for nbextensions without explicit compatibility.
Tick Hide input
Tick Hide input all
You can check out and enable other extensions according to your requirement.
Now we are done with the one time set up steps.
End Game
Go back to the Jupyter Notebook that you created earlier. Create a markdown cell and put in some text such as name of your project. Rename the notebook as as index.
Hit Save. In the toolbar, click the Export to HTML button. This will download a HTML file with same name as our notebook in the downloads folders. Drag this file into the Project/Website folder that you created earlier.
Make sure every time you create a new notebook and generate a HTML file of it, update the index notebook to include a link to these HTML files and repeat step 2.
Now, create a new Notebook, do some coding and analysis. Once you are done, hit Save.
Click the Toggle Everything button in the toolbar. This will hide all the code from the notebook. Click the Hide Codecell Inputs button in the toolbar. This will hide all the chuncks of code from the notebook and we are left with a beautiful layout.
If you do not want to hide the code cells, you can skip step 5.
If you want to hide only selected cells, Go to View -> Cell Toolbar and select Hide Code. This enables you to tweak each cell individually.
Repeat step 2 every time you create a new notebook or update a current notebook. Remember, do not use the download as HTML from File menu. This won't preserve the hide code functionalities in your HTML file.
Finally push the files from your local folder to your GitHub repository. Steps
Once you push the files to your github repository, your website is ready at the URL provided by GitHub in the last step of Configure Project Repositories section above.